Showing posts with label campaign Planning. Show all posts

Tuesday, December 15, 2015

Chain of Command Campaign: Drive to Kharkov 1941

I recently started looking for an East Front Campaign that I would like to do. Mark had me nearly sold on the Ponyri Station actions that were part of the Kursk battle. I however stumbled across something from earlier towards the tail end of 1941. This one does not feature any Italians for once.

I started looking at the drive from Poltava to Kharkov that happened in September and October 1941. This is a very interesting action. The German armor is very limited. The Soviets were using significant numbers of T-34 tanks while the Germans had a rather battle worn battalion of STuG IIIs. The Germans were led by the 101st Light Division and the 57th Infantry Division. They were supported by Sturmgeschutz Abteilung 197. These troops had taken terrible casualties during the invasion and push through the Ukraine. The 57th Infantry Division had taken 3,893 casualties from June 22nd to the end of September. Of these there were 888 killed, 2937 wounded and another 68 missing. Yet they still drove forward. The STuG Battalion was not much better with several of the companies were reduced to a point of being combat ineffective due to casualties and broken or destroyed vehicles. The 197th used some captured T-34 tanks as spare vehicles during the advance on Kharkov to supplement their losses.

The Soviets were still reeling from the initial blows of Operation Barbarossa. They had begun to modify their orders of battle to account for the loss of personnel and equipment. The armor was initially based in large Mechanized Corps. Due to losses, armor was now placed into Brigades that consisted of an Armored Regiment and a Motorized Infantry Brigade. These brigades were formed around battalions that had a single company of seven T-34 medium tanks and two additional companies of whatever light tanks happened to be available. There were few if any of the heavier KV models available. In addition, industrial centers such as Kharkov and Stalingrad were producing makeshift armor to fill in the vacancies. Notably were the KhTZ-16 self propelled guns. These were tractors that were fitted with armor and a cannon that were sent out to engage the Germans. They were nearly all destroyed quickly when encountered in the field.

Armor was not the only arm of the Soviet military that was changed. The Infantry division also underwent change at this time. The rifle platoon was reduced from four squads to three. The platoon 50mm mortar was removed and a small two gun battery was held at the company level. Manpower shortages were overcome by pressing civilians into service. German reports of facing battalions of men in their forties and fifties are found in the engagements of both the 101st Light and 57th Infantry Divisions. To some degree, the formations became easier to manage. But with poorly trained troops and an officer corps still under the thumb of the Commissars, they proved to be brittle.

What really captured my attention was the description of a Soviet probe into the town of Poltawa (or Poltava depending on whose site you are looking at). The Soviets sent a platoon of T-34 tanks to investigate the defenses of the city. Elements of the 101st Light Division were holding the town at the time. The Third battalion of the 229th Infantry Regiment was reinforced with a Sanitation company (medics) and two platoons of 37mm Anti-Tank Guns (6 guns in total). At 1400 hours, two tanks approached from the east. At a distance of 500 meters, three Anti-Tank guns opened fire. The rounds bounced off the armor of the Soviet tanks. The tanks advanced to within 200 meters of the of the first houses of the city. They split up and entered the city. What ensued was a nearly comical pursuit of the tanks through the streets of the town. It involved the tanks stumbling across the medics, engineer teams attempting to plant explosives on the tanks and the 37mm guns ineffectively attacking them. One of the tanks even spent time stuck in a ditch in the town. The Germans were able to bring forward a 50mm Anti-Tank gun. Each of the two tanks needed multiple hits from the 50mm gun before they were disabled or destroyed. One of the crews was captured and the other was killed in their vehicles. The fight lasted for an hour and a half.

When interrogating the tank crew, they found that they were raw crews that were dispatched to probe the town. They were told that the Germans lacked guns that would be able to penetrate the armor of the T-34. They remained buttoned up in their vehicles throughout their engagement and as such caused fewer casualties because they could not see the infantry running between the houses. In a separate story about the T-34, the Germans reported that the Soviet drivers carried a large hammer next to them to address the transmission when the vehicle had issues changing gears.

The campaign has lots of interesting elements. Urban terrain, good armor (Stug III & T-34), improvised armor (KhTZ-16) and lots of infantry. It has its problems as well. It is hard to sort out who was fighting on the Soviet side. There are at least three armored brigades in the same relative area. There are multiple Soviet infantry divisions in the area. The unit histories only list the 216th Infantry Division as the opponent in Kharkov on the Soviet side. But the German situation maps (http://www.wwii-photos-maps.com/) from September 18th to October 25th, do not show them there. There are infantry divisions listed on the Soviet side of the same situation maps that Charles Sharp (Red Legions: Soviet Rifle Divisions Formed Before June 1941) claims were disbanded or destroyed elsewhere. In short, it is difficult to determine who is where. The book on the 197th Stug Battalion (Munch's The Combat History of German Heavy Anti-Tank Unit 653 in World War II), has dates that do not match up with the dates that I see in the 57th ID and the 101st Light Division's histories. From the Stug claims, they led the way without the infantry for most of these actions.

The other problem is the lack of quality maps for the battles. Http://www.wwii-photos-maps.com/ has the most complete set that I could locate anywhere. They are only 1:50000 scale and not 1:25000 scale that Rich, of TooFatLardies, recommends using. But there are some excellent photos to be found of the cities mentioned. Several of them show the streets of Kharkov. It seems only the outlying parts of the city were shelled heavily and the bulk of the city remained in tact. Fill this in with the eyewitness descriptions of the street fighting and we can fill in the blanks with our imagination.

So I will be creating some new Force Lists to match the Soviet ORBAT changes. My thought it to play the campaign using the Big Chain of Command supplement. Each of the actions seem to lend themselves to larger forces than a single platoon. Granted for a T-34 platoon, you are only dealing with two vehicles.

The campaign will begin after the action I mentioned above. However, I am thinking of some stand alone scenarios to go along with it that would use some specialty rules. Specifically the tank hunt through Poltava. Anyway, that is my current idea. Anyone have any recommendations on where I can get accounts of the Soviet side of the battle? I am fresh out of ideas.

Wednesday, February 5, 2014

Chain of Command - Sharp End on the East Front

Background
I have decided to attempt a Chain of Command Campaign. I want to base this at the start of Operation Barbarossa. I am basing this on an ordinary rifle platoons. I have created a German and a Soviet platoon for this but have set up the campaign so that it is based on a company moving forward on three parallel roads towards the Ukrainian town of Annowka just north of the Romanian border. The town is the objective of the campaign. I am using only a half ladder campaign as it is an invasion.

Update There is a name generator that I used to come up with the names for my platoon leaders: http://fantasynamegenerators.com/russian_names.php#.UvKF87S1sa4

German Background

June 22, 1941 - Romanian Border with the Ukraine
Your unit has been ordered to move from Rommanian territory into Ukraine/Moldova to liberate the German population there. You are to push up the road toward the town of Annowka. There are 400 Germans suffering under yoke of bolshevism that must be liberated. Your company will advance in parallel to you to sweep the Communists from our path and liberate the Germans of the Ukraine.

The platoon is lead by Leutnant Emil Hartz, who was raised in the ranks of the Hitler Jugend and is taking his place leading his platoon in combat for the first time. He is assisted rather ably by Feldwebel Gerwin Radder who before the war was a simple waiter in Danzig. He moved in 1938 in order to don the uniform.

Note: I am using the platoon structure from the 1940 list rather than the actual structure at the start of Barbarossa.

The four squad leaders come from across Germany. Guntar Boche is a former dockworker from Hamburg. He is a huge and strong man. Jurgen Skroch was a gamekeeper for the Duke von Anhalt in Dessau before the war. Now he is an experienced soldier. Jules Herzing was an office clerk in Berlin before waking up after a drinking binge to find himself in the army. He has proven competent enough. Last is the youngest of the leaders, Kain Jutte. He was just recently a schoolboy who joined the colors in a fit of patriotic fervor.

Campaign Map
The campaign is semi-historical in that is it based off of actual maps from the period and contains plausible troops. The map is an extract from map M-35-136-C that is hosted on www.wwii-photos-maps.com. This is a great site and worth a visit.

Scenario 1 Preparation
The Germans can choose up to list 4 in supports. They are opting for an Adjutant and a Sdkfz 221.

Yet to come
I will post on the Soviet forces tomorrow. If Brian or Mark decide on joining in this madness, I will add their notes here as well.

Wednesday, September 4, 2013

Roman Dux under Construction

Well I have decided to to the German Limes route with this. The Upper German-Raetian Limes to be exact. This was a 353 mile (568km) stretch of fortifications with some 900 watchtowers and over 60 forts. Each watchtower was behind the palisade wall by some 20 to 50 meters. Each watchtower was separated by 300 to 800 meters provided they had a clear line of sight to one another. Just as with Hadrian's wall there were small fortlets (kleinkastel) staged along that held detachments from 40 to 80 men in strength. My area that I wish to copy is that of the Cohort fort of Saalburg. This is a great site in that they have some of the most complete reconstructions of a roman fort in Germany. Also it is dead easy to find data for it on the internet. (Remember, I am lazy.)

What did I stumble upon today but the most marvelous site: Vici.org. It has fantastic maps of the whole area that I am looking to include in my campaign. Here is the first map I made from this site.


Map from Vici.org. Terrible white lettering over the map is all mine.

Here we see the Cohort Fort of Saalburg with the watchtowers associated with it and the milecastle/kleinkastle that also had the same unit - Lochmühle. Saalburg was the home of Cohors II Raetorum Civium Romanorum Equitata. This was an Auxiliary unit that was at least in part mounted. This fits in with my preference for a mixed unit. To the northeast, Lochmühle had elements of the same unit present. While the milefort to the southwest was a unit of Auxiliaries from Legio XXII.

The Cohors II Raetorum Civium Romanorum Equitata was a Cohors Quingenaria Equitata unit. Formed by six centuries of infantry (80 men each) and four turma of cavalry (30 men each). This matches with the size of the fort.

The fort of Saalburg is well documented and there are any number of diagrams showing what it would have been like.


Taken from http://www.saalburgmuseum.de/geschichte/kastellgeschichte.html

Just 200 meters from the back gate of the Saalburg fort is the lime itself. The German Wikipedia sites are actually really helpful here. There is a diagram of what the gate through the lime would have looked like near this fort.


taken from http://de.wikipedia.org/wiki/Datei:ORL_A_03_tab_10_pic_03_Limes%C3%BCbergang_Saalburg.jpg

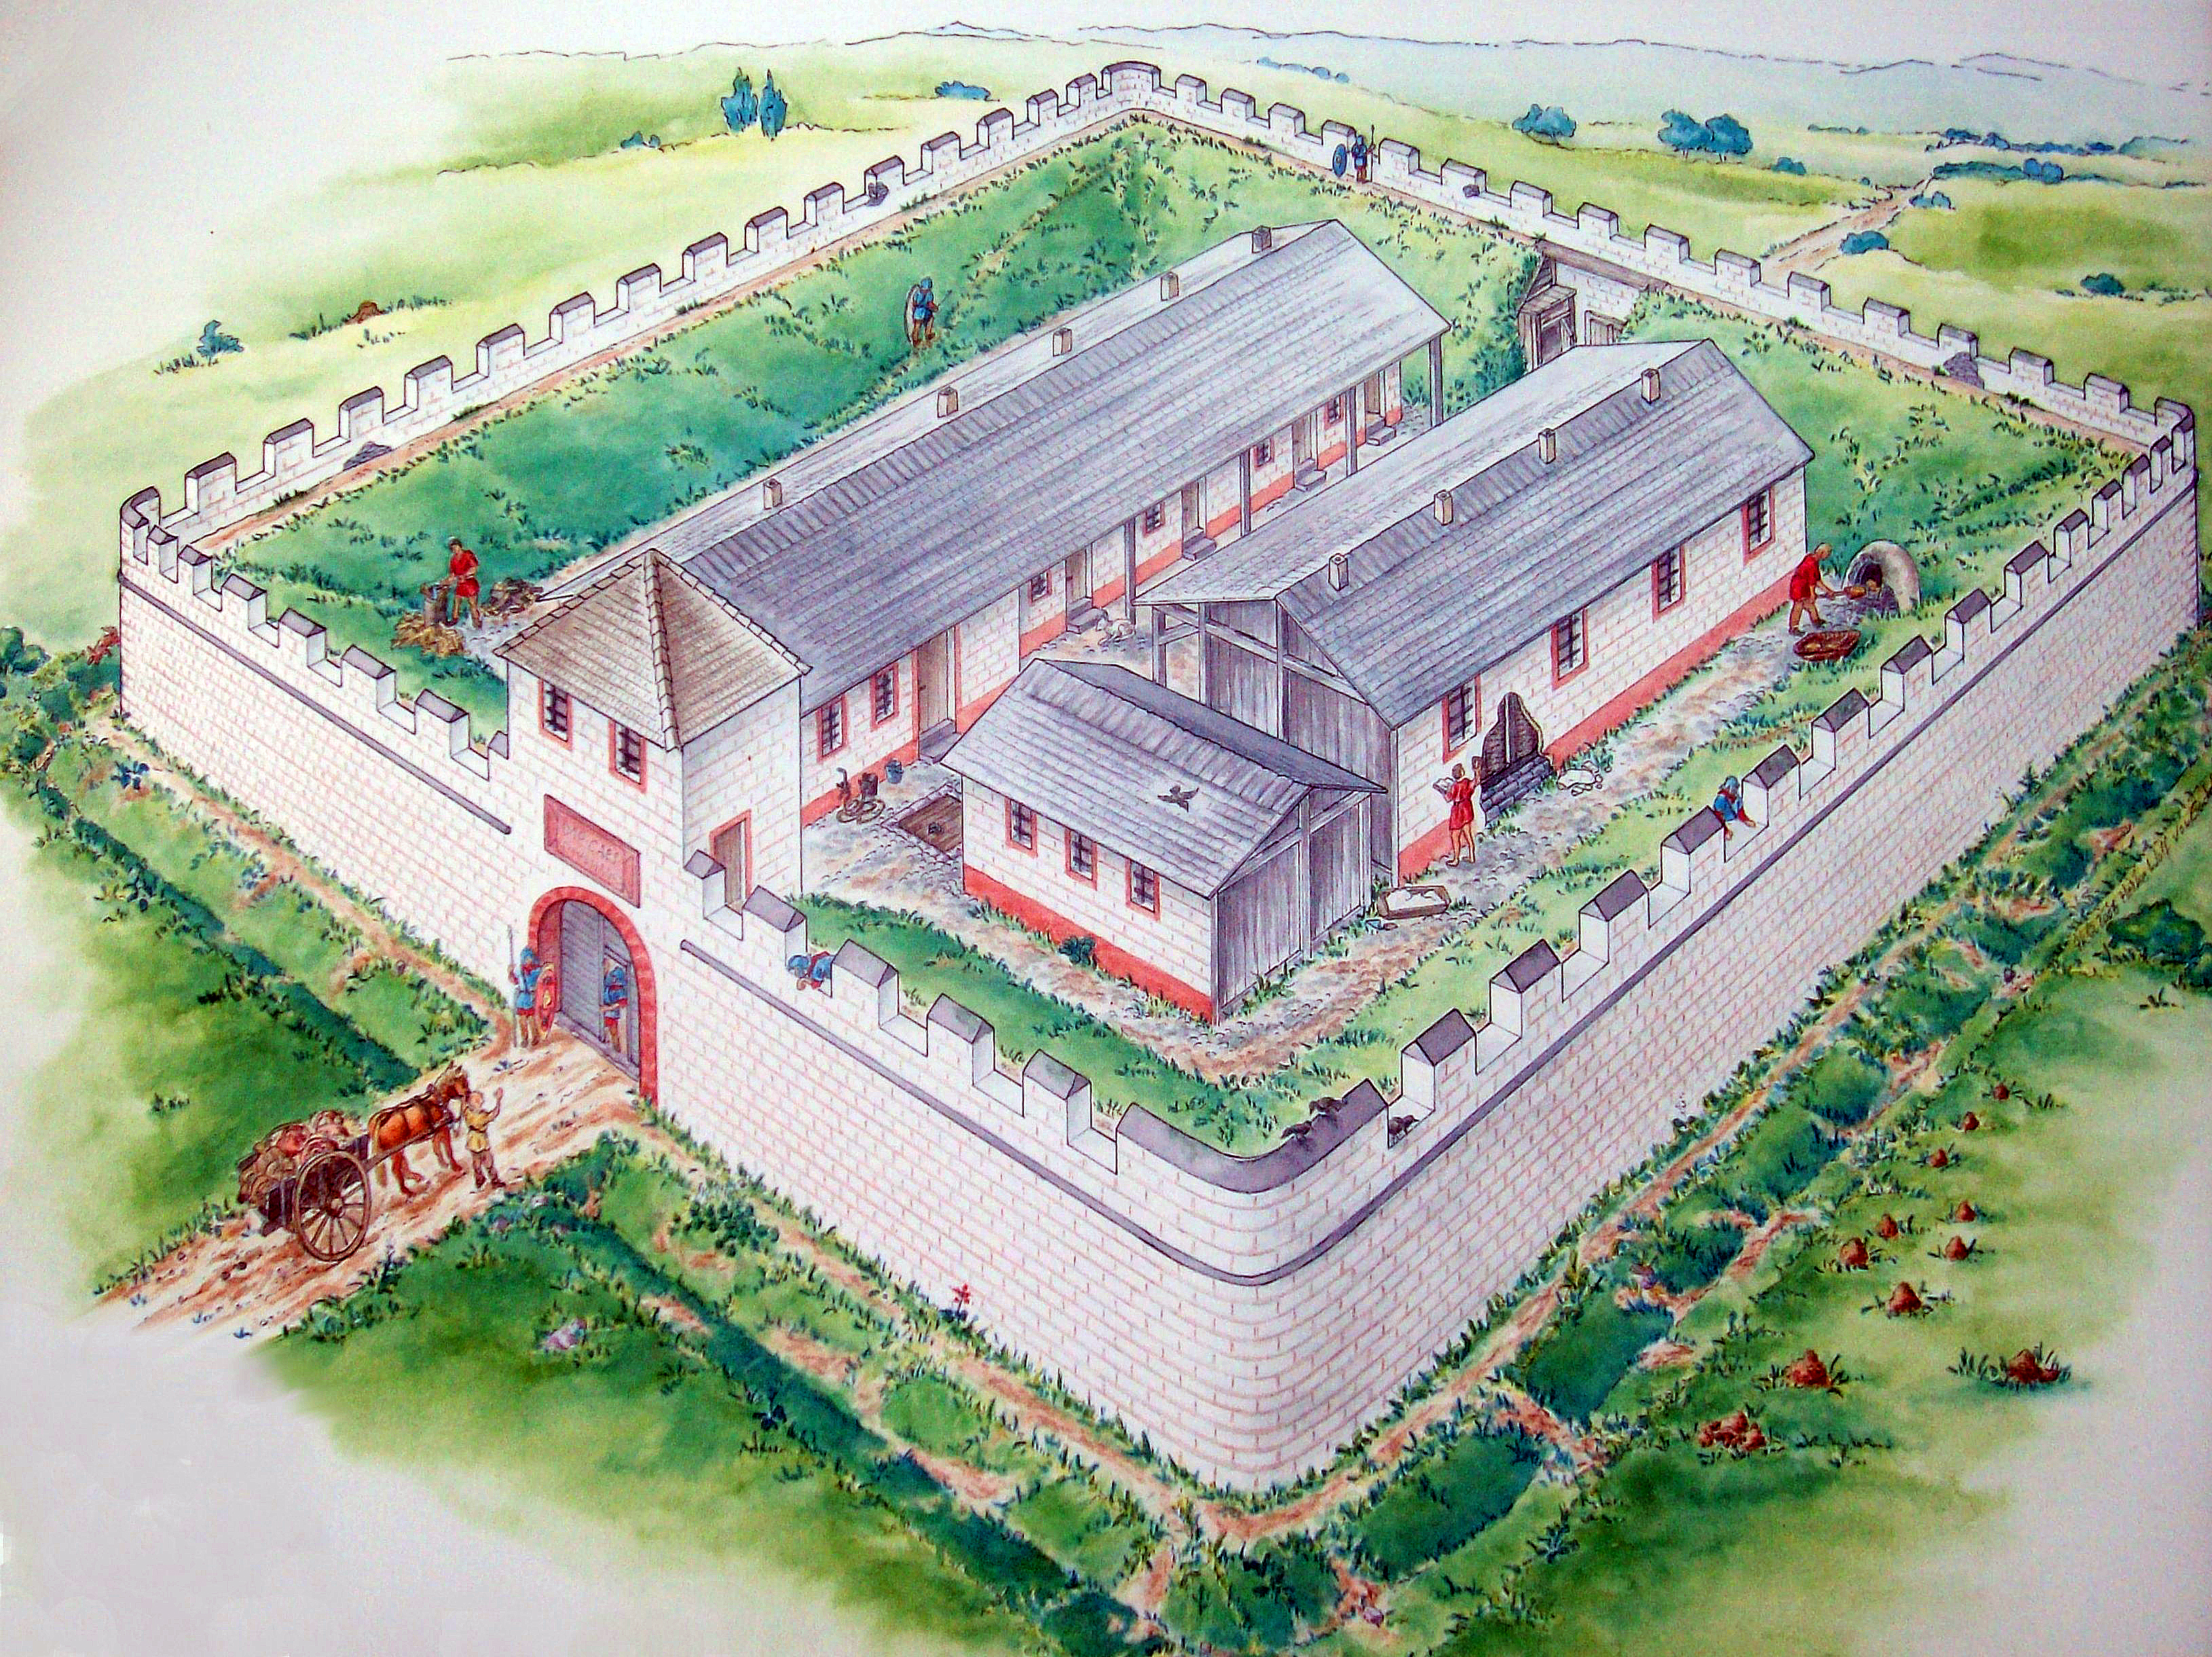
The child fort at Lochmühle is another story. This is far less documented as what it would look like. The general size is known. It was a 18 meter by 22 meter rectangle. It was set back about 30 meters from the lime. The artists reconstruction is dubious in that some sources claim that this fort had only one gate and this shows two gates.


Image taken from http://upload.wikimedia.org/wikipedia/de/8/8b/Kleinkastell_Maisel_-_Kleinkastell_Lochm%C3%BChle_-_Ringwall_H%C3%BCnerber_069.JPG.

Basically if you take the drawing at face value, there are room for 4 tent parties and an officer in the truncated barracks as well as a storeroom, a workshop and an outdoor oven. So that works out to about 32 men plus a head NCO, just under half a century.

That just leaves the watchtowers. These would be temporary duty for about 8 men who would take turns manning the towers. These would be wood or stone structures of 3 stories in height with the entrance on the second floor. In addition to this, there would be the patrols. Plenty of things to be going on for a campaign.

I am putting an artificial dividing line for the towers to be at tower 3/63 for the purpose of the campaign. That would be as far to the southwest as the troops at Saalburg would have to patrol.

Now, if push really comes to shove and the forces at Saalburg need backup, they have to call out to Legio XXII Primigenia Pia Fidelis at Mogontiacum or Legio VIII Augusta at Argentoratum or even Legio III Italica at Castra Regina. This could come into play if I ever venture into 6mm miniatures for Romans.

I think my next step will be to make some terrain.